Forgive me if you don’t know what video editing is. This post is for those just beginning the journey or needing a refresher.
Debates may arise over the first film, with some pointing to the groundbreaking Horse in Motion (1878). This cinematic marvel was crafted using multiple cameras, a collection of still photographs ingeniously assembled into a motion picture. A staggering 24 cameras were employed to capture this pioneering piece of film history.
Actual motion picture cameras were developed in the 1880s. That is when the camera started capturing all the single images on one reel. At this time, there was no editing. Each film ran as long as there was a film to roll.
Early filmmakers would shoot scenes, halting the camera’s crank when they deemed the shot complete. They would then reset for the next scene, resuming the crank when all was ready. This marked the nascent stage of editing, a form of editing within the camera that did not involve manipulation of the reel.
Editing began in the 1900s. Did you know that one of the first reasons for editing is that studios want films to be longer? They wanted multiple film reels compiled into one continuous movie. After that revelation, they started putting images together to try and tell a story.
One of the very first films that not only combined reels but began to develop some rules (or guidelines, as I prefer) for video editing is The Great Train Robbery (1903)
Watch this movie and realize
There is action/movement in every scene
They maintain screen direction (except for one edit)
There is sequencing
Each edit advances the story
There is an effort made in pacing/rhythm
Editing has mostly stayed the same for over 100 years.
When you make your cut and move on to the next shot, there are so many reasons to consider. Ask yourself these questions as you make decisions.
Did someone complete a thought? If you apply thought completions to your edit decisions, you will be amazed at how it changes your editing.
Am I continuing a rhythm (pacing) with this edit-decision? Often turning off the sound and tapping a pencil on your desk every time you see an edit will help you discover pacing problems.
Am I disrupting the rhythm of the story with this cut, and is there a reason to do that? This is fun! Make a cut (or don’t) at a moment that creates a feeling that you want to convey to the audience like surprise, sadness, anger. Make your audience feel something because of your edit.
Am I cutting because the value of the shot is over? Sometimes it’s really this simple. Don’t be afraid to make a cut simply because the value of the shot is complete.
Am I cutting for match-action? I sometimes will make a decision about an edit for a match-action reason, and that will override other logic.
Does this cut, at the moment I choose to advance my story? This should override everything, really. Did it advance the story? If it doesn’t improve the story, then it should be for another reason, like rhythm.
What if I don’t make a cut at this moment? Sometimes the best edit is one you don’t make.
Lastly, how about you DON’T make an edit. What does this do to your story if you simply don’t make an edit at this point? Does this decision NOT to make a cut make your story better?
The guidelines of six come from the Rule of six. What’s the Rule of six, you ask?
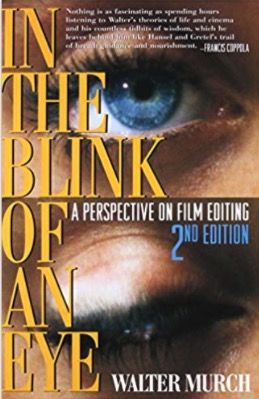
It’s an editing concept I first learned about reading In The Blink of An Eye.
Walter Murch is a film editor for Apocalypse Now, The Godfather III, and many other films.
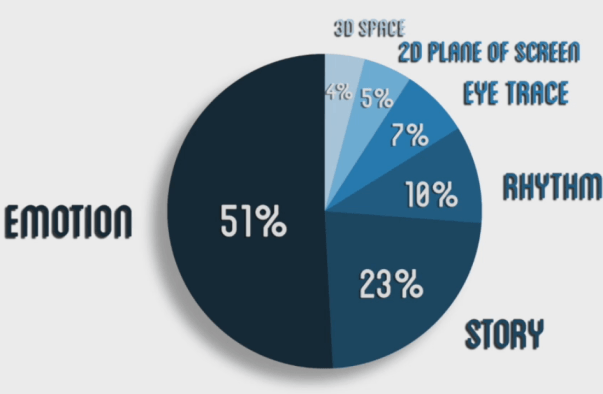
The Rule of six is a list of rules you should follow with each cut you make.
1) Emotion 2) Story 3) Rhythm or pacing 4) Eye-trace (leading or directing the eye to what the viewer should look at) 5) Two-dimensional plane of the screen (or screen direction/180 rule) 6) Three-dimensional space of action (or continuity)
This list was developed for film. However, you can apply it to all visual storytelling. It’s a logic to the edit decisions you make every day. I’ve broken down a story you can see the Rule of six in action.
I’m not a big fan of rules. I prefer guidelines.
So, from here on out, we’ll refer to this as The Guidelines of Six in Video Editing. I use this in news, program, documentary, corporate, and commercial/promotional editing.
This is a segment from the Extreme Kellie franchise I edited at KDVR/KWGN.
The story starts with an aerial of paragliders.
The next shot, the shadow of the paraglider.
The action of the shot is happening at the same position in both shots. The action is just left of center, that’s not by accident. That’s me wanting you to look at precisely what I want you to look at.
I’m using rule #4, eye-trace (leading or directing the eye to what the viewer should look at).
The next shot I’m cutting for rhythm/pacing, rule #3.
I always like to think about eye trace (rule #4) when I’m editing. Every shot won’t work, and nor should you try and make every shot work. If you went for eye trace in each shot, you’d spend a lot of time looking and not a lot of time cutting. I’m cutting for rhythm or pacing here. I wanna maintain an individual pace, and this rule overrides eye trace. Oh yeah, you should follow the guidelines in order. Keeps these rules (or guidelines as I like to call them) at the top of your mind as you cut.
Heck, maybe you should print this out and paste in on you NLE for future edits.
What’s this mean? You should cut for emotion over everything. Think about your last edit and how it would have been different in your followed the guidelines of six.
The number #1 guidelines for storytelling is emotion.
Remember, emotion overrides all.
I don’t care if the video is blue if the shot is shaky if there is a swish pan to get to the emotion.
Never cut away from emotion, always cut to emotion.
Guideline #2 is the story. Really start thinking about this Rule. I mean really, really start thinking about this Rule. Did you advance your story? You should always be advancing your story. If you not, then see if the reason why you’re making a cut falls under guidelines 3,4,5 or 6.
Back to the video, we go.
I do a series of faster edits at [:08] for rhythm. I’m simply cutting to the music.
Notice the paragliders are mostly centered in this series of shots. I always have eye trace in the back of my thoughts.
Now here’s a spot that you could argue that rhythm, guideline 3, is an over-riding story, guideline 2. The shots are still relevant to the story. I’m not showing crazy tights shot of the sky? I’m showing paragliders. Story and rhythm are working together here.
Back to eye trace here at [:11] Paragliders are just above center and just to the left.
In that same spot just above center and to the left, Kelly’s head (The instructor Kelly, not the anchor Kellie); more eye trace in action.
The shot at [:23] is for rhythm and advancing the story.
As you can see, no eye trace into the edit. But, out of the edit take a look at [:27]
You are looking at the paraglider. Your eyes are looking just left of the center frame. I’m getting you ready to look at what I want you to, which is Kelly (instructor) putting the harness on Kellie (anchor).
Ok, I’ve to think you’ve got the whole eye trace thing. So, I’m not going to point those out anymore.
The shot from Kellie and Kelly wide above to the shot tight shot Kellie putting on the backpack fall under two dimensional plane of Screen (screen direction), or guideline #5. Kellie (anchor) is on the left, and Kelly (the instructor) is on the right.
I maintain screen direction, but I override continuity rule #6. Do you see how Kellie (anchor) turned at [:28]. She facing left at [:28]
but facing right in the tight shot at [:29]
I maintain screen direction, but I break continuity.
A word about guideline #6, three-dimensional space of action, or continuity. Continuity is the guideline that is incredibly hard to maintain in broadcast news editing. The easiest way to get around continuity is tight shots.
From [:45] to [:59] I’m just thinking about guideline 4 or screen direction. This is a sequence of getting the paragliders up. I’m also advancing the story, guideline 2.
At [:59] I cut to a shot of Kellie giving the camera a thumbs up.
This shot is for emotion, guideline #1. I’m showing Kellie’s enthusiasm.
From [1:00] to [1:10], I’m thinking about rhythm.
At [1:11], Kellie talks about being nervous.
Emotion, guideline #1. I’m NOT going to make a cut even though the photographer adjusts the iris during the shot. I break rhythm too by keeping this shot up so long.
Emotion over-riding all.
From [1:20] to [1:44], I’m cutting for rhythm and for the story.
This slideshow requires JavaScript.
At [1:45], Kellie shows emotion, and I stay with it.
There are several more examples of the guidelines of six and how it implies to each edit. I invite you to watch the piece and really look at each edit and ask yourself, why did he do that?
Rarely is one edit made based on one guideline; more often, several rules are in play.
I do want to point out something toward the end of the story.
These 3 shots are jump cuts.
I don’t care.
Each shot has emotion. No need to cut away from it. This is another example of emotion over-riding all.
Spatial relation is an often-overlooked principle of video editing. Spatial relation is something your brain has been processing since you were a baby.
Around the 8th month of life, you begin moving around your world. You explore the size and shape of objects and observe people and objects as they move through space.
How does this connect to editing video? Well, your brain wants to understand the world, too. Since your brain was in its infancy, it’s been trying to figure out where things go. As an editor, you must help the audience understand where they are in the world they watch. You have to help them connect points in space or time. So how do you do that?
It’s an important shot because it tells you this person is ill. I’m getting you into the story. You have no idea where he is. The 2nd shot is a medium shot
You see his hand and chest rising (I match the narration). The 3rd shot is a medium shot back to his face.
See how he looks up? The next shot is his mother above him.
With the 3rd shot, themedium of him on the bed at [:05], and this shot edited together, I’m establishing a spatial relationship between Reece and his mother and how they exist in his bedroom.
We know we are in the bedroom. I need to move Reece to a different position on the bed. First, I’m going to use a tight shot, so the audience doesn’t feel jarred by the fact he’s in a different spot on the bed, and the apparatus on his face is no longer there.
There is a series of shots of him on the bed with his mom helping him get ready for the day. All these shots are tight or medium.
I firmly believe in tight shots’ power and love using them. My 2nd most loved shot is the wide shot. As wide as you possibly can be in the environment you arein. Why? Your audience needs to understand the world you are putting them in, and the best way to do that is with wide shots.
In this story, I established that Reece is in bed. Now, by going wide,
the audience understands where Reece is, where mom is, and what else is in the room about those two. That is editing, keeping in mind spatial relations.
At [:48], I start wide this time.
You see Reece still on the bed and his mother holding a tube. Then, a match action cut off her using the tube to suction material out of his lungs.
The general guideline in editing is to start wide, then move to a medium shot, then to a tight shot. That doesn’t always work (hence why it’s a guideline and not a rule). Sometimes, I start a sequence broad. Sometimes, I start a sequence tight. It depends on the shots I have and how they work together and maintain spatial relationships with each other. I don’t want the viewer distracted. I don’t want to be curious about how everything works in my world. I’m editing. I want to help them as much as possible so they can watch the story and not watch the editing.
At [:52], I need to go to the next part of the story. I use a tight shot.
of mom beating on Reece’s chest.
Then, to a tight shot of Mom. Then, to a medium of the two of them.
I could put these three shots together in any order, and they would have worked. The previous sequence dictated how I put these shots together. The important thing is that I went to a medium shot, whereyou could see the two of them and how they relate to where they are in their world.
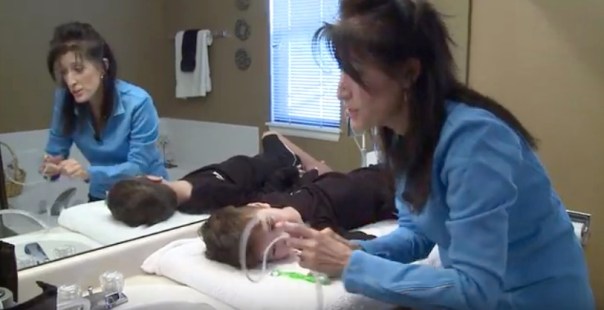
At 1:09, I start tight again.
Then go wide,
so the viewer understands we are now in the bathroom. I started tight because I didn’t want a jump cut from the interview to mom in the bathroom, just trying to avoid anything jarring to the viewer.
At 1:48, Reece is in a new spot.
On the kitchen table. Then, a tight shot of his hand on the mouse ball.
If I only have time to show two shots in a sequence, I’m generally going to use a wide shot and a tight shot. Wide is for spatial relation, and tight is because I want the viewer to look at only one piece of information (which a tight shot should contain).
I continue moving Reece around the house, using tight shots and then wide shots so the viewer understands where he is in the world I’m editing.
My photographer gave me lots of tight shots to choose from. I wished for more wide shots, even some super-wide shots.
Understanding spatial relations is significant in editing. Help your audience know where they are and what goes where in the world that’s in front of them. The tight shot is a vital storytelling tool. The vast and super-wide shots are #2 on my list.