Tag Archives: Edit Foundry

In The Style Of Jump Editing

You know how to edit.  You understand the basic concepts of video editing.  You know the importance of a sequence.  You’ve grasped screen direction.  You know the importance of tight shots.  You know the rules, which are more guidelines than rules.  So, you want to break some rules?

This is a style that you could use, no matter what type of storyteller you are.  I call this jump editing.

Jump cuts are intentional.  There are some rules to jump editing (or guidelines).

Are you ever given a story that just screams jump cuts?  I was given a few of these in my time in a newsroom.  The goal is to tell the story of a makeover while weaving a story of a woman that is ambushed.  I have fun with stories like these.  I do have a method to this madness I call jump editing.  I’m going to share my process.

I cut the story as tight as I can.  I fit as much story and visuals as I can in 1:45.  You see lots of edits, not too many, but enough to make the story fast and fun.

Our story for this post is She’s a Lady.

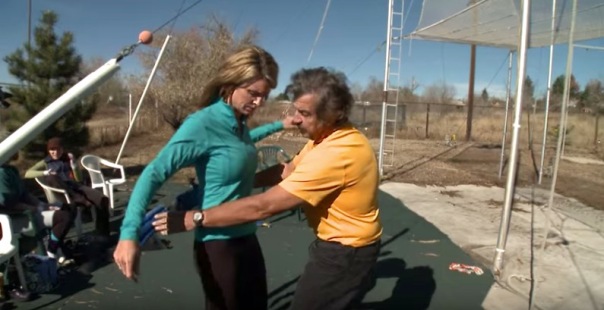
Our story begins with our host walking up to an unsuspecting woman.

In the second shot of the story [:02], I increase the scale to 130%.  I take the edit mid-motion.  Taking edits on motion helps disguise jump cuts a little, music videos do this all the time.

Why did I increase the scale?  So the next shot isn’t as brutal of a jump cut with this shot.  The change in scale creates two shots with a little bit of a difference in composition.

Her position in the frame helps as well.  Another idea I didn’t do.  Re-size the image and move it to adjust where the person is in the frame.

The next shot, the videographer pans from our makeover candidate to our show host.  The shot ends looking like this.

I break up the host talking about the ambush (she rambles on with information that doesn’t advance the story) when I make the next edit. It is this [from 08 to 10].

Again, I use the same trick as before.  I increase the scale of the shot. In this shot, I increase the scale to 120%.

It is enough of a compositional change that hides a jump cut (sort of). I make another edit breaking up our host talking.  I change the scale back to 100%.

You’ll see later in the piece jump cuts where our woman is in different spots in the store.  I’m ok with those kinds of jump cuts regardless of editing style.  When you are going from the interview or the one being interviewed and the composition is the exact same, I think a subtle change in composition really helps these edits not become too jarring.

When our subjects accept, the shot of her accepting is fast.  There are two pans back to back.  Another way I hid the jump cuts, I use the pan and make my cuts on the movement or right before the movement starts.  After the pans, we are introduced to an assistant in the makeover.

Then I edit a shot of everyone entering the first store. The camera is still panning when I take the edit, and everyone entering the store is moving [:09].  There is a lot of change in the composition as well, two things that ease the jump cut.

They are in the store, and then I go back to the interview in the middle of the mall.  Why?  I always like to show emotion on camera.  Emotion overrides all in editing, right?  That’s why I go back outside of the store because our candidate is excited about her makeover.

A music montage follows.  I’m using Tom Jones’ She a Lady for this story.  I love me some Tom Jones.  The song also fits the story very well. In the montage notice again a lot of movement.

The edit at [:15] I take just when she pulls her head up.

The next shot at [:16] I take the edit right as she turns her head.  The next shot at [:17], there isn’t much movement.  It’s also not a jump cut from the shot at [:16].  Back to a jump cut at [:18] and back to finding the movement to edit on.

After the music montage, I tell a little bit about her story.  We get to know our candidate.  Everybody has a story.  The prime objective is to just show the makeover; however, I wanted to tell a more of a story.  I am a storyteller, you know.

Several Jump cuts after this use as much movement as I can find in the shots the videographer brought back.

At [:39], the videographer does a swish zoom out.  I only use this once.  It’s too distracting for me to use a lot.   I liked using it here to break up all the jump cuts.

Transitional shot next at [:42].  Not everything has to be a jump cut.  A chance to bring the music up full as well.

I use the transitional to transition them into the next store.

Once I get into the store, I use more tight shots than I did before.  We are in a jewelry store, and jewelry is small, that just lends itself to tight shots.  How else are we going to see the pretty jewelry?

Another music montage at [:56].  Again I’m finding motion in the edits.

We move to another store at [1:03]. This time I simply use a pan down from the outside store sign to them entering for my transitional shot.

The sequence from [1:13] to [1:21] is my favorite part of the story.

Women LOVE trying on shoes.  I say it again.  Women LOVE to try on shoes.  Showing all these shoe shots is good.  Showing her moving her foot, in the mirror, her foot bouncing all shows happiness in her, and the viewer feels it.

This is followed by her asking her daughter if she likes mommies shoes, and then she says, “so fun!”  I don’t change the composition of the shots.  I don’t cut away. Why? Editing for emotion.

So what to take out of this post?

  • Learn the rules (guidelines) and break them (appropriately).
  • Use motion to help with your jump cuts
  • Re-size shots to change composition a little to help with jump cuts
  • Jump cuts are fun, but don’t go overboard.  Too many become distracting.  Find a balance.
  • Still, try to tell a story
  • Remember, emotion first. That overrides all else in editing.

Thank you for reading.  Please follow the Edit Foundry on Facebook

You Better Know Your Trim Tools for Video Editing

I’ve been editing on non-linear systems since 1997.

OLYMPUS DIGITAL CAMERA

Learn your trim tools.  Please learn your trim tools.  Make yourself a better video editor.

Every time I learn or re-learn an NLE, I make sure I understand the trim tools.

I don’t care which NLE you’re on.  You better have an excellent grasp of trimming.

I think this is THE MOST essential set of tools on an NLE.  Are you with me?  I’m trying to make you better.

I use the trim tools every time I edit, EVERY TIME. The trim tools make an editor’s life easier. Trimming is polishing your edits.

Screen Shot 2020-03-30 at 1.25.40 PM

I think trimming is one of the hardest concepts to grasp when you’re learning about non-linear editing.

What is trimming?  I took this definition from Final Cut Pro HD Hands-On Training by Larry Jordan.

“Trimming is the process of removing, or adding, frames to the beginning and end of your shots so that the edits flow naturally, maintaining your story, without calling attention to your editing.”

So why should you trim?  What’s a great benefit?  These are the tools that make your edits better, and it’s quick.  Eventually, it’ll make you better.

I’m going to speak about trimming in general and why and how.

I used to edit on a non-linear system very linear-ly.  Meaning I would mark an in and an out and place it into the timeline.  If I didn’t like the edit, I would undo and reset mine in and out.  THAT’S A WASTE OF TIME.  The material you want is already down in the timeline.
Once you place clips onto the timeline, you should never go back to the preview window or re-load the clip ever.

If you don’t like the IN, then trim it.

I’ll use the story, Swinging on the Trapeze on my YouTube site to show you how I utilized some trim tools in the edit.


At [:21] into the story, you hear the beginning of a sentence from the gentlemen helping Kellie with the harness.  He says, “It’s gonna be…, then I show him.

Screen Shot 2020-03-30 at 1.28.20 PM

I place the edit of Kellie and the gentlemen down on the timeline.  I then ripple the video of the woman on the Trapeze just over this new edit.  I made a J cut (Whoohoo!).

Screen Shot 2020-03-30 at 1.29.04 PM

Simply select the edit you want to extend.  In this case, the end of the clip that has the woman on the Trapeze (ONLY THE VIDEO). 

In Premiere Pro I love I can just hold down the option key, and I can select only one track (basically unlinking a video and audio track)

At [:35], I make another J cut.  You see other women on the Trapeze.

Screen Shot 2020-03-30 at 1.32.27 PM

And you hear Kellie say, “So this’ll keep..”  and then I cut to Kellie after that.

Screen Shot 2020-03-30 at 1.32.36 PM

Between these two shots, I select the edit.  I choose the rolling tool and drag that edit forward to where I want it to be.

At [2:06] is a match-action sequence of Kellie swinging on the Trapeze.

Screen Shot 2020-03-30 at 1.36.29 PM

The 2nd shot in the sequence is Kellie swinging from the platform and then all the way back to the platform.

Screen Shot 2020-03-30 at 1.36.37 PM

I’m confident the action is matched here.  But maybe I want to tweak it a few frames.  I like my duration of the clip (two seconds) I’ve laid down.  I want to slip it a few frames.

Meaning I’m going to change the in and the out with one tool.  I’m going to zoom in to the clip on the timeline,  select the slip tool, and drag the clip forward and backward until I like my new in and out point while maintaining my duration.

Screen Shot 2020-03-30 at 1.38.10 PM

The Slip tool works great for a situation like this.  Trying to help with your match-action in a sequence.

Screen Shot 2020-03-30 at 1.38.16 PM

Slip, roll, extend edits are the easiest I think to try and explain.  A ripple while isn’t any more complicated; it’ just a hard to explain in a blog.

What do I want you to learn from this entry?  The next time your editing and you want to change something, use a trim tool.  Sometimes just playing around with the trim tools are your best way of learning.  I still discover new uses for each trim tool everyday.

Play and learn.

Thanks for reading.  Don’t forget to like The Edit Foundry on Facebook

I’ll Have Your Eyes Exactly Where I Want Them

Do you think an editor can make a viewer’s eyes move?  Yes, they can.  It happens all the time.  The next time you watch a movie, think about precisely what you’re looking at on the screen.  Chances are an editor is using eye-trace to get you to look at precisely what they want you to look at.

Our story for this post is Joe’s Smile


Over the years, I have done research on eye-trace.  It’s a simple concept, to begin with, and if you think about it in your everyday editing, it’ll improve so many little things.

In this post, I like to bring your attention to what is going on in the shots you choose.

  • The action affects what the viewer is looking at

  • Eye trace sends the viewer’s eye where you want them to go

  • You can control what people are exactly going to look at

 You cannot think about every edit and what’s happening in every shot, quite often there isn’t time in your projects.  The more you keep eye-trace in mind, the easier you are going to make several edits in your story.

I want the viewer to look at certain things.  My edits are going to help.  In Joe’s Smile, you may see more example of eye-trace, I’m only going to point out some.

Eye-trace has two primary objectives.

  1. To keep the eye focused on the same point on the screen (or close to there as possible) as the last frame of an edit ends, and the new frame of the next edit starts.  Confused?  I was too.  Here’s an example.

In the shot above at [:15] in the story, Joe looks up and turns his head to the right (our left).

Then, I make an edit as he’s in mid-turn.  He completes his head turn in the next shot.  Your eye catches his head moving, and then in the next shot, I have your eyes exactly where I want them, to the left of the screen focused on Joe.  Your eyes followed Joe through the edit and didn’t scan the screen for something else to look at.  That’s eye trace, putting the viewer’s eyes where YOU want them.

Think of it as you are a magician.  A magician’s job is to get the audience to look at what he wants them to look at.  Like that ball in his hand and not the other hand in his pocket getting the next part of the trick ready.  Your ideal job as an editor, keep the viewer’s eye where you want them.

The edit’s also hidden by Joe’s movement.  Meaning you don’t really realize there is an edit there because the action looks natural.

Here another example at [:21].  Your eyes go to his head as he starts to move his head I cut.

His head movement completes this shot above at [:22].  Your eye’s stayed on the left side of the screen in relatively the same place.  I kept them there using eye-trace logic.

Think about editing on movement the next time you’re doing a story.  Think about keeping all that movement on the same point on the screen.  Break your screen in 4 quadrants.  Try keeping the movement in one of those quadrants for 2 edits. It’s not that easy and won’t work ALL the time,  but it’s pretty when it does.

Here is an entirely different example of eye-trace.  People will always look at the eyes of whoever is in your shot. Everyone’s natural curiosity is to wonder what he/she is looking at.  So, if you show a shot of someone looking at something, your next obvious shot is what they are looking at.

At [1:22], we have a shot of the dentist looking down.  Notice the dentist is predominately screen left. What’s he looking at?

We should show the viewer.  He’s looking at Joe’s teeth, or lack thereof [1:23].  Notice Joe is predominately screen right.  This is another example of eye-trace.  If you were to follow the dentist’s eye’s down from the shot of him to the next shot of Joe, you’d trace his line of sight almost entirely. 

This is another example of eye trace.  The viewer naturally looks down, and as their eyes move down, you take edit and place what you want them to see in that next shot and that point in the frame, eye trace in action.

One more example.  Joe’s got his new teeth, and he’s smiling!  What’s he laughing at?  Again realize Joe’s screen right.

I know there are two women in this shot, but the women on the left are laughing and catch your eye first.  So, following Joe’s line of sight, it’s logical to think he’s looking at her.  With this edit, I make the viewer perceive that as well.  The women on the right looking at the women laughing helps as well with this.

I thought I’d show you an example of a bad edit too.  At [2:49], we have Joe smiling with his new teeth. Joe’s screen left as he smiles.

But in the next shot, he’s screen right smiling.  I didn’t put the viewer’s eye where I should of.  Like I said, it won’t always work.

Now go and practice eye trace in your editing.

Thank you for reading.  As always don’t forget about the Edit Foundry on Facebook

It Went Viral! But did the editing help?

In my post-news career in the freelance world, I do many different types of productions.  I do corporate videos, presentations, music videos, business profiles, and much more.  The rules of editing I learned in my news career I still apply as often as I can when I produce material today.

This production went viral.  This Ignite talk by Ash Beckham is the #1 Ignite talk viewed ever on Youtube. It’s been viewed over 550,000 times!

My editing had nothing to do with this video going viral.  The content drove it to be viewed by so many.  I do think my editing helped in the viewing and understanding of the content.  Yes, there is a logic in editing this video.

If you are familiar with Walter Murch, you know about blink points.  If you are not, allow me to explain.  When you listen to someone talking to you, your blinks may, in fact, coincide with your understanding of the information.  You quite often blink when you’re brain has processed some info.

Walter Murch has a theory that the human blink is emotional punctuation.  Murch found that nearly every single time he decided to make a cut, a character in a movie he was editing would blink very close to the frame he chose to make an edit on.  He concluded a person will blink every time they understand thought or emotion.
“So it seems to me,” Murch says, “that our rate of blinking is somehow geared more to our emotional state and to the nature and frequency of our thoughts than to the atmospheric environment we happen to find ourselves in.  The blink is either something that helps an internal separation of thought to take place, or it is an involuntary reflex accompanying the mental separation that is taking place anyway.”

As I was editing the Ignite Boulder presentations, I used this ideal.  The first sentence Ash says is, “My name is Ash, and I can say unequivocally I am so gay.” and right after she completes that thought, I make an edit.

I put her graphic on the screen full, and she says, “… eliminating the word gay as a pejorative from our lexicon.” She completes the thought, and I make an edit.

I am using her completions of thoughts to make edit decisions. I’m not using her complete sentences.  Quite often, you see multiple edits make before she completes a sentence.  Now I will sometimes use other cues to make my decision.  Perhaps I make a decision because I want to cut to the full-screen graphic. After all, she talks about it.  For the most part, in this edit, I used what I felt were thought completions. Here’s an example.

Explain to you the difference between what I just said and what this image conveys (CUT).  Now you may be saying Ash we live in Boulder we love gays here, (CUT) we have pride, we have BCAP all true, (CUT) but I guarantee you there are places you go every day (CUT).

As you can see, I’m not waiting for her to complete a sentence but a thought.  Watch the entire video and really concentrate on it when she makes a complete thought.  Watch how often I have an edit at that same moment.

Here is another example in the edit when I use blink points.  At [1:38] she says

“The top row they’ve all come out, (CUT) now the bottom row we cross our fingers but (CUT) until they do, their cartoons and muppets so at the very least they’re happy (CUT).  Now there is a long list of things that you should never call so gay (CUT); an assignment you don’t wanna do is not so gay(CUT). Someone’s new haircut is not so gay (CUT). A workout you don’t like is no so gay (CUT).  A test that you bombed is not so gay (CUT). Someone’s car is not so gay (CUT).   Now again, I may be preaching to the Boulder loving gay choir (CUT).”

Blinks point can be used in ANY type of edit.  Blink points should be used in EVERY edit.  Next time you are stuck with where to make an edit, think about blink points.

Thanks for reading.